
The homeowner considering residing a home is faced with more than half a dozen choices as to the material that should be used. The decision that the homeowner ultimately makes is an important one because a home is probably the biggest investment a person makes, and the choice of a siding which will protect that home that investment is one of the most important decisions that a homeowner is faced with.
This article does not attempt to sell the homeowner any particular type of home siding. The purpose of this article is merely to provide the homeowner with as much unbiased information as possible about one particular type of siding vinyl siding so that the homeowner can include this information when making an informed decision. So here are vinyl siding pros and cons.
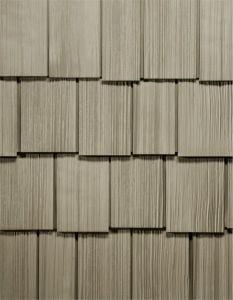
Vinyl siding has made huge strides in just the past few years. Many old notions of vinyl must be discarded and the  homeowner needs to come to this discussion with an uncluttered perspective. From an aesthetics standpoint, today’s vinyl mimics the look of real wood much more realistically than the faux-wood vinyl panels of just a few years ago. One of the reasons some people disliked the vinyl panels of even ten years ago was the fact that the panels had a seam in them that destroyed the illusion that they might be wood. Today’s vinyl has no seams and the texture of the panels looks more like wood than ever.
The true key to vinyl is the thickness of the siding. Many homeowners are unaware that vinyl comes in at least three gauges or thicknesses, or that the gauge of the siding they choose determines how long their siding will last. Obviously, the thicker the vinyl is, the thicker the gauge and the more the siding will cost.
The vinyl sold in many home centers is 40 to 45 gauge size. This is adequate and can last 25 years or more in many climates. However, for the homeowner who wants true durability and a siding that can last 40 years or more with little or no maintenance, a 55-gauge (.55 inch thick) siding is recommended.
Vinyl panels generally come fully painted, with the color infused with the vinyl itself so it cannot flake or chip off. Homeowners can choose from a wide palette of colors, matching almost any color scheme the homeowner can come up with. If just the right shade is not available in a pre-colored vinyl panel, vinyl siding can be painted any color that the homeowner chooses.
One of the primary reasons that vinyl has become “king” in the house siding world is that once the vinyl is installed, there is virtually no maintenance to perform for the next 30 or 40 years.
That is not to say that a vinyl panel attached to a home today will look just as good 40 years from now as it does now it will not, but if a homeowner does nothing to a 55-gauge panel for forty years, it could still do its job of keeping the home dry and safe in many climates. And that is something.
Of course, to keep a home’s vinyl siding looking good and relatively new, the siding will need to be washed at least  once per year and painted every eight to 10 years. Under the glare of the sun, the colors infused into vinyl panels do fade with time, so without a certain amount of care, such as occasionally repainting, vinyl siding does tend to look old after a few years.
Another point to keep in mind is cost. Vinyl is one of the least expensive sidings a homeowner can buy. Not only are the initial costs less than virtually any other siding, but the installation is also fast and inexpensive as well due to vinyl’s lightweight and interlocking design.
Vinyl does have its drawbacks, however, and homeowners need to be aware of them. For one thing, vinyl dents rather easily, even the heavier gauges. An errant baseball, hail, or even a power wash can dent vinyl, and very often the dents do not pop back out no matter what the homeowner does.
If a panel is dented or needs to be replaced for any other reason, it can be extremely difficult, time-consuming and expensive. Vinyl panels overlap, and because they are attached in an interlocking pattern, they can be extremely difficult to remove and it can be almost impossible to insert a new piece of siding.
Not only that but matching the color of an existing panel with a new panel can be virtually impossible unless the damaged panel is almost new. The reason for this is that the colors permeated into vinyl panels fade over time, making a newly inserted panel stand out. Also, it can happen that a manufacturer will cease manufacturing a certain color of panel, making it impossible to color-match an older piece of vinyl.
Cold can also be a vinyl killer. In extremely cold weather, vinyl can become brittle and crack under the least provocation. Cracks in the siding allow water to seep behind the vinyl and that can cause incalculable damage to the framing of a home.
There can be another problem with cold weather: vinyl does not insulate well. This problem can be alleviated, at  least to a large degree, by either wrapping the home with an insulating house wrap or putting heavy-duty insulation into each wall cavity before the vinyl is applied. There is a thin insulating material that can be placed under the vinyl itself, but this does little in the way of actually insulating a home against either cold or heat. The cost of additional insulation must be calculated into the total price of vinyl siding when making siding comparisons.
In extreme heat temperatures, vinyl siding can also melt and cause severe problems in locations where irregular weather patterns are the norm.
To sum up, the main advantages of vinyl are its low cost and ease of installation combined with its low maintenance. Some homeowners are also pleased with the way modern vinyl panels look. Drawbacks include being easily dented, the difficulty of replacing individual panels, color fading and potential cracking in extremely cold weather. All of these factors must be weighed carefully against the pros and cons of other types of siding when making a decision as important as installing new siding on a home.


 designs of all structures, including residences and businesses. They were very popular in building construction before the advent of central air because buildings with these windows stayed cooler and more comfortable in the hot summer months than buildings without them.
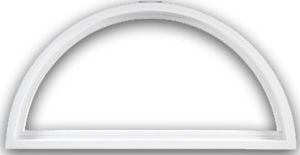 open decorative fans. This type of window is either fixed in place or hinged at the base to allow the frame to swing from one direction to the other. This style of transom window is usually designed as much for decorative beauty as it is for practicality.
 spatters as well as the chemicals in cleaning solutions and paint strippers:
 operated by an experienced operator, as this tool can cause serious damage to an exterior if misused.
 the exterior.
 satin and eggshell paints are good choices for these areas because they are much easier to clean than the matte version of indoor paint. Satin finish works best on walls because it is more reflective, while eggshell works better on ceilings because it does not emit as much glare.
 expensive paint type as well as the most difficult to find.
 detailed recommendations.
 drop-cloth on top of that. Should a light fixture be immovable, wrap it carefully with plastic. A garbage bag serves this purpose well.
 remove the paint without gouging the wall. A scraper with edges that can be sharpened and a stiff wire brush are good tools to use here.
 on which one to use depends on the wood species to be stained, the space in which the work will be accomplished, and how important environmental friendliness is to the homeowner.
 homeowner needs to come to this discussion with an uncluttered perspective. From an aesthetics standpoint, today’s vinyl mimics the look of real wood much more realistically than the faux-wood vinyl panels of just a few years ago. One of the reasons some people disliked the vinyl panels of even ten years ago was the fact that the panels had a seam in them that destroyed the illusion that they might be wood. Today’s vinyl has no seams and the texture of the panels looks more like wood than ever.
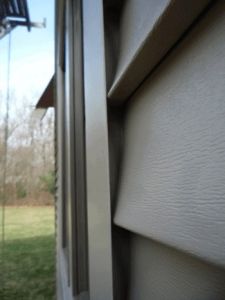 once per year and painted every eight to 10 years. Under the glare of the sun, the colors infused into vinyl panels do fade with time, so without a certain amount of care, such as occasionally repainting, vinyl siding does tend to look old after a few years.
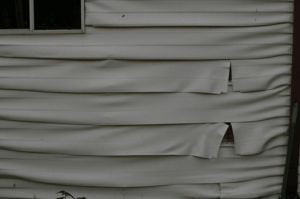 least to a large degree, by either wrapping the home with an insulating house wrap or putting heavy-duty insulation into each wall cavity before the vinyl is applied. There is a thin insulating material that can be placed under the vinyl itself, but this does little in the way of actually insulating a home against either cold or heat. The cost of additional insulation must be calculated into the total price of vinyl siding when making siding comparisons.
 may also be due to new paint being applied over loose old paint.
 high quality paint for the home’s climatic conditions should be carefully applied.