There are many events in daily life that can damage the beauty of a home’s interior paint. Following is a list of some of the most frequent types of interior painting flaws, along with their causes, how they can be repaired and the supplies required for each instance of damage.
Peeling Paint
The peeling paint woe is a very common one. It normally occurs because of moisture underneath the paint.  Moisture causes the paint to lose its adhesive quality, allowing the surface paint to crack and peel.
The peeling paint phenomenon is usually found in rooms where there is high humidity, such as the bathroom, kitchen or basement. Leaky flashing around a chimney or exterior wall can also cause water to seep into the home’s interior. This makes the plaster beneath the paint wet, causing the paint to separate from the wall.
Repairing damaged interior paint due to moisture begins with eradicating the cause. The high humidity spaces should be ventilated with an exhaust fan to remove the moisture and expel it to the outside.
The home’s roof, walls and soffits on the exterior need to be properly ventilated as well. Damaged or missing flashing around the chimney or any wall-roof connection need to be repaired. Once the source of the moisture is found and eliminated, the interior painting can proceed.
To prepare the painting surface, all peeling paint must be scraped off and the affected areas sanded. Once smoothed, a primer coat should be applied to the sanded areas. When the primer is dry, a new coat of paint matching the existing wall paint can be brushed or rolled on. These procedures, properly executed, will stop all further incidences of peeling paint.
The supplies required to accomplish this repair are sandpaper, primer, paint, and paintbrush or paint roller.
Mold and Mildew
Mold and mildew is usually associated with a home’s exterior, but the interior of the home can be affected as well. 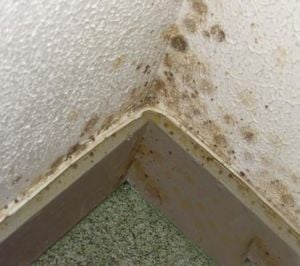 Mildew is a fungus and appears as splotches on the paint surface in colors of grey, brown, green or black.
It, too, is caused by moisture and poor ventilation. It can also be caused by painting over a surface that was improperly cleaned of previous mildew. Additionally, the use of low-quality, non-mildew-proof paint can be the culprit.
The treatment that solves the mildew problem involves scrubbing the affected area with a bleach solution of one part bleach to three parts water. The solution must remain on the surface for 10 to 15 minutes, and should then be rinsed with plain, clean water. The area is then washed again with a detergent and water solution followed by a thorough water rinse. Once the surface is completely dry, it is painted with a quality interior paint.
The necessary supplies for successful mildew treatment are simple: bleach, detergent, high-quality paint, and paintbrush or paint roller.
These problems, caused by excessive moisture and poor ventilation, are especially prevalent in areas with heavy rain and snowfall that may last for months. The New England states are prime examples of these climatic conditions. Homeowners in the states of Rhode Island, Massachusetts and New Hampshire should turn to the professionals at United Home Experts for their home remodeling needs whether for repairing damaged interior or exterior paint and many other home remodeling and maintenance projects.
Sagging or Running Paint
This damage gives the painted surface a droopy, uneven look. The cause can be a too-heavy application of paint,  paint overly thinned, or painting in an overly humid environment. It can also be due to a lack of primer coat being applied and a dirty surface at the time it is painted.
To recover from this problem, should the paint still be wet, the paint can be redistributed using a brush or roller to smooth the droops. Once the sagging paint has dried, it must be sanded to a dull finish so that the new paint will adhere. Another fix is to apply a primer coat and repaint.
To avoid this problem altogether, the paint should be applied in two thin coats rather than one heavy one. The necessary supplies for this repair are sandpaper, paintbrush and/or paint roller, primer and paint.
Of course, everyday accidents can cause paint removal in areas hit hard by moving furniture, or hit with force by any heavy object. Anything constantly rubbing against a painted surface will eventually wear off the paint. In all of these cases, the affected areas need to be sanded smooth and repainted.
Regardless of the extent or cause, repairing damaged interior paint can be successfully accomplished. No homeowner, particularly those living in regions of extreme climatic conditions, need live with damaged interior painted walls.

Flashing is a continuous series of thin pieces of sheet metal or other waterproof material that is installed to keep water from getting into a building from a vulnerable angle or joint. It typically operates under the principle that, in order for water to get through a joint, it must fight against gravity and work its way up. In the case of hard rain that is being driven by the wind, the driving force of the heavy rain would have to be diminished. Roof flashing can be installed in one of two ways. It can either be concealed or exposed on the outside of a building’s roof.
Flashing that is exposed is usually made of sheet metal like aluminum, copper, lead or lead-coated copper, painted galvanized steel, stainless steel, terne metal, or zinc alloy. This is how flashing got its name: the metal material catches the sunlight and reflects it, creating an eye-popping, flashing effect. Copper is one of the best metal materials to use for exterior flashing because it is durable and malleable. Using copper in any roofing project will ensure that no weak points exist in the roofing structure. As opposed to some other flashing materials, copper will not destruct if exposed for long periods to sunlight.
Concealed flashing is usually made of either sheet metal or a waterproofing membrane such as fabric made from bituminous coal or sheet material made from plastic. Which type of membrane is used really depends on the climate and on the building’s structural requirements. Aluminum and lead are not recommended for use as concealed flashing materials because they experience adverse chemical reactions when coming in contact with cement mortar.
There are two main kinds of roof flashing:
Flashing that is placed around objects that stick out from a building’s roof, like chimneys or pipes, to keep water from pooling at joints or seams by forcing it to run off.
Roof penetration flashing is used around cables, pipes, and supports to waterproof these vulnerable areas by providing a protective barrier.
There are many types and brands of flashing available on the market, but homeowners may have trouble deciding between all the different brands and styles. Flashing is a difficult project that is essential to execute with great precision, so it is a good idea for homeowners to seek professional help rather than try to do it themselves. The flashing has to be carefully constructed and strategically placed so that water is definitely deflected away from the roof’s trouble spots and not into the underlying structure of the roof (and the home). Flashing installation done by nonprofessionals can lead to all sorts of trouble for the homeowner and the home, including mold, water seepage, leaks and structural damage.
The trustworthy professionals at United Home Experts are specially trained in all aspects of roofing, so they know all the best types of flashing and are able to install it correctly, ensuring a quality roof maintenance or construction job for any home. Homeowners can contact them for a free estimate and expert advice before undertaking any roof project. For more information about roofs, visit our main roofing page!

No industry, including the painting trade, can afford to stand still for long. One of the few constants is that everything changes. While many factors, some seemingly obscure, affect the public’s color choices and painting trends in indoor paint for the year, the one thing that most painting experts agree on is that for the next twelve months the growing strength of the economy and a generally hopeful outlook on the world will spark a resurgence of positivity and forward thinking when it comes to painting trends for 2013. Optimism will be the driving force behind interior color trends in the coming year.
According to Dee Schlotter, national color brand manager of Pittsburgh Paints, 2013 will see a move away from the grays and “depression era” colors of the last few years and into a more open, colorful and vibrant range of indoor paint colors.
So what colors speak of optimism and the search for new horizons? The painting experts at Sherwin Williams, one of the top brands of paint in this country, see pastels as the new trend for 2013. When companies and decorators 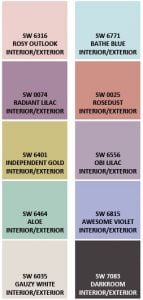 speak of today’s pastels, they are not referring to the ghastly pastels of the 1980s. The pastels for 2013 will be a lot creamier, a lot softer. Lighthearted colors, open and free, are all the rage, reflecting a new sense of calm and innocence.
According to Heartland Bold, the trend for the coming year is “big, bold, bright colors!” For example, a clean blue color with no green is one of the colors that is expected to be big in 2013.
Not every room needs to reflect this new bright and bold outlook. Some muted colors such as creams, beiges and similar introspective colors, and combinations reflecting a desire to gather the family around a safe and comfortable environment, are likely to continue for the next few years. However, the long-term trend in color is toward the brighter, more outgoing shades that reflect a new boldness, an optimistic outlook on life and the world in general.
Many color design specialists see a mixing of light and dark colors in the same room, or in adjoining living spaces 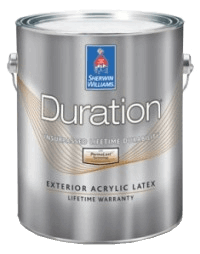 as a possible trend. Such eclectic mixing of colors and moods is emblematic of new-thinking ideas. Combined with paint color trends away from the somber, accent colors will also be much more lively and upbeat in the coming year. Look for trim colors to be lighter and more bold, and look for fabric designers to follow suit, creating pillows and other accent pieces that scream out for attention.
Homeowners who want to take advantage of this new thinking in terms of interior paint should consult the painting experts at United Home Experts. The color experts at UHE are well-versed in all of the latest trends and they carry only the best paints with long-term guarantees. Homeowners in the New England area can count on UHE for free, expert painting advice with no obligation to purchase.
As our country lifts itself out of its economic woes and shakes off the old ways of thinking to embrace a new and brighter future, so, too, is the collective American psyche gearing up for a brighter and more colorful future, a future bright with hope and dreams and – above all – a new optimism that will be reflected in its choice of paint for its living area. Welcome to the optimistic – and bright blue – new world of 2013. For more information about interior painting, visit our main painting page!
Bay windows extend outward from the wall of the structure, creating a nook in the interior of the room. The  windows are generally located on the first level of the building and may extend all the way to the ground below.
Bay window styles and designs are numerous and each of them adds distinctive architectural interest to an otherwise bland exterior. While the windows are usually associated with Victorian-style buildings, they lend grace and charm to many architectural styles, whether historic or contemporary.
Homeowners in the New England states of Massachusetts, Rhode Island and New Hampshire interested in replacement bay windows should look to the home remodeling professionals at United Home Experts for their window replacement needs. The UHE staff is thoroughly experienced in window installation and can give advice on various styles and manufacturers of bay windows.
Now that the definition of what constitutes a bay window is clear, following is a description of a few of the bay window styles and designs the homeowner might want to consider discussing with a local window replacement contractor.
The Oriel Bay
This type of bay window defies the first-level placement rule stated earlier, as they are commonly found on the upper story of the building. Oriel windows are generally placed over the entrance to the building and are usually supported by stone or brick brackets or corbels. They are representative of the Gothic Revival style of architecture established in England in the mid-18th century. The term “oriel” is from the Latin word for porch.
The Box Bay
Box bay-style windows, as the name implies, are shaped like a box. The windows consist of a set of three  windowpanes capped by a small roof. The usual design is a large center windowpane flanked by two smaller panes. The box bay window is a perfect way to open up space without repositioning any walls. These windows are very often seen in combination with an interior window seat.
The Circle Bay
These windows are larger than the oriel style and more embellished than the box style. The circle bay also incorporates more panes than the box bay and is apt to feature the application of elaborate and intricate moldings. They can be up to six feet high and may extend  outward from the building by two or three feet. This window style takes great advantage of a view and lets in much natural light. Many are capped with a cone-shaped roof. This window came into its own during the Queen Anne Victorian era of the 1870s.
The Bow Bay
Bow bays can be located on any level of a structure and are gently curved rather than straight-sided like the other bay styles. They are generally created by combining four or more casement windows together to form an arch. The casement panes are attached to the  frame with hinges on the sides of the windows. The bow bay window first appeared in 18th-century England and the American Federal Period.
While these bay window styles all add interest to the exterior of a building, they also serve to enhance the interior of the building by expanding the space and letting in light to brighten it up.
Because painting the exterior of one’s home is best done under certain weather conditions, one must consider the  time of the year in which to paint the outside of one’s home. Ideally, one should begin painting when the weather is dry and the temperature is not extreme, typically from the spring to the fall. However, circumstances may arise that convince a homeowner to paint the home outside of the painting season, and in such a case certain precautions are necessary to ensure the exterior painting is done effectively.
Best Time to Paint Exterior
In the past, it was generally thought that one should not paint when temperatures were below 50 degrees Fahrenheit, though with the improved quality of paint, especially premium paint such as Sherwin-Williams, one may paint with temperatures as low as 35 or 40 degrees. The paint may also be sensitive to large swings in temperature in a relatively short period of time, as for example when the daytime temperature reaches over 100 degrees and the nighttime temperature reaches below 50 degrees. It may thus be advantageous to select a time of the year without such temperature extremes in a single day. Temperatures may be most consistent during the fall in some parts of the country.
One may paint the exterior of one’s home during the winter season, though it may present certain challenges. A painting contractor may simply paint when the opportunity arises, taking breaks when it gets too cold or snowy. Because business may slow down during the winter months for many contractors, homeowners may get better deals when hiring them during the winter. Another advantage to painting one’s home in the winter is that it may be the driest season in some parts of the United States, such as the Northeast. In warmer parts of the country, the optimal time may be year-round.
Choosing the Right Paint
Regardless of the season that is chosen for exterior painting, it is important that a premium paint, such as  Sherwin-Williams, be used. Consumer Reports has rated Sherwin-Williams paints among the highest quality paints for the exterior of one’s home. In tests of durability and appearance, Sherwin-Williams has consistently scored among the best, and it is among the most preferred by reputable painting contractors, such as United Home Experts. Because painting one’s home can potentially add significant value to it, it is important to consider the type of paint used, as well as the quality and reputation of the company doing the painting.
Another factor a homeowner should take into account is the damage to a garden that may be caused by traffic when painting. One should therefore fix up the garden after the painting job is finished, to avoid having to redo the garden. Planting new flowers and mulching after the painting job is finished will complement the painting and add beauty to the home.
Choosing the Right Company
For selecting experienced professionals to paint the exterior of one’s home, United Home Experts will get the job done in a cost-effective and efficacious manner. United Home Experts can schedule an appointment at one’s convenience in order to provide a quote.

One of the most important choices any homeowner can make when it comes to interior decorating is what color to paint the inside walls. Along with color, another important decision is which type of paint to use on the inside. Certain types of paint work better in some areas than do others, and these differences need to be taken into consideration when paint choice is made.
Another thing that needs to be thought of is interior paint protection. Some homes – especially homes with young children living in them – will need to have more interior paint protection than will other homes. Some types of paint have this protection automatically built in, which is great news for the homeowner. Sherwin Williams has a wide range of paints with added durability enhancers. Here is an overview of a few of their most helpful products.
Before painting, the interior surface will need to be primed. White-Pigmented Shellac Primer is a good choice for wood and plaster interiors as well as ceiling surfaces. It is great for high traffic areas, where there is more of an opportunity for staining to occur and dirt to accumulate. For interior plaster and/or drywall surfaces that have already been painted, the Loxon acrylic conditioner is a better choice.
Another clear winner when it comes to indoor paint primers is the All Surface Enamel Primer, which comes in both a latex and an oil based version. This primer is truly what its name suggests. It can be used on a vast array of surfaces, such as aluminum, drywall, galvanized steel, masonry, plaster, steel, and wood. This primer offers great paint protection at a superior value.
After the primer has been applied, it is time to paint the inside walls of the house. Every decent indoor paint job 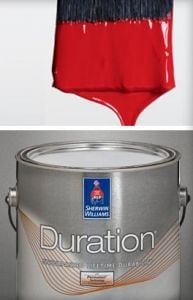 requires at least two coats of a very high quality latex paint like Sherwin-Williams’ Duration Home(R) Interior Acrylic Latex Paint in order to ensure the best paint protection and durability. This particular brand of paint offers extraordinary washability for any busy home. It is perfect for high use areas like hallways, kitchens, and children’s bedrooms. Because it is so durable and washable, it is a great choice for homes with very young children, who tend to be pretty hard on indoor paint jobs.
A clear choice when it comes to bathrooms and other areas that are prone to collect moisture, like kitchens, front hall closets, basements, garages, and laundry rooms is the paint with the semi-gloss finish that is simply called Bath Paint. This type of paint is specially formulated to resist mildew, so both the paint and the home itself will be protected.
An indoor paint job should not be undertaken by anyone without first consulting someone knowledgeable and experienced in indoor painting. Homeowners who need more information about choosing the right paint for their homes should contact the professionals at United Home Experts for a free estimate. They can give more detailed advice regarding selecting the best indoor paint and the best paint protection for any home through our easy, no pressured, free estimates. For more information about painting, click here to visit our main painting page!

When it comes to decorating a room, everyone wants it to reflect their personality and taste. The color scheme will also make a very noticeable impact on the ambience and feel of the room. There are some design tips for interior painting that are very important and should be followed without fail.When picking out a color, keeping in mind the decor and furniture that will occupy the room surely helps. If the furniture is large and loud, there is a great need to downplay the colors of the wall. If the furniture is simple and sleek, going for classic color schemes like the monochromatic is helpful.
When picking paint samples and deciding on a color scheme, thinking about the color that is one’s favorite and one that is liked most can be a great start. Seeing the samples and swatches for that color will definitely be the first step in deciding a color. If a blue, green or purple color is chosen, in order to reduce the monotony, the walls can have a graduated tint and each wall can have a different shade of the same color. The colors on the walls can be arranged in descending or ascending order of their intensities and brightness.
Another great color scheme is to pick any two walls or just a single wall and paint it a different color than the rest. When doing this, keeping in mind that the odd color should complement or contrast the colors on the rest of the walls and there should be perfect harmony among the chosen colors.
When picking out paint samples, choosing to make one wall as the focal point. Adding decorative wallpaper, wall decoration or some such accentuating highlight is another way to go. In such a case, making sure that the wallpaper that is chosen complements the patterns on the upholstery and goes perfectly with the color scheme is another of the rules that will make the decor all the more delectable. A section of a single wall is also being painted a different color to demarcate functional boundaries.
A monochromatic color scheme gives a very clean, suave and sophisticated look to the room. When it is coupled with white colored furniture, the pristine look is indeed breathtaking. Adding colorful partitions, paintings and furniture can make the room look lively without having to paint the walls a bright color. If one is not too comfortable with coupling black and white, picking other neutral shades like beige, navy and grey is another great alternative. If only one color is favored, making sure to accentuate key aspects of the room by adding some contrasting and quirky decor is another doable interior painting design.
Choosing paint samples and interior painting can be a walk in a park with friends or family who have excellent tastes and advise nicely about choosing a great color scheme. Also, painting a home and taking the help of family to get the job done will only be a great way to bond, interact and have fun.