
There is nothing like a quality paint job on an exterior to add visual appeal, protection and value to the home. Painting a home’s exterior takes time and consideration, particularly when it comes to choosing outdoor paint. It is not just the color that needs careful consideration. The quality of the outdoor paint will make a substantial difference in its durability and its ability to keep the color fresh and new-looking after several years of exposure to the elements. Homeowners in harsh and extreme weather conditions such as in the New England states must pay particular attention to the quality of the exterior paint.
When it comes to outdoor paint prices, it is a bad decision to purchase the cheapest paint available, even if the color is perfect. The pricier paint is actually formulated differently than the cheap brands. The higher price is due to the cost of the premium ingredients used in manufacturing the paint.
Any home improvement store, large or small, will offer a massive array of outdoor paint colors. The brands they stock will differ, however. Some will offer Behr or Olympic; others Valspar, Glidden or Dutch Boy. Sherwin-Williams has its own chain of retail stores. Following are the top three outdoor paint brands used and recommended by professional painting contractors.
I just want to make a clear indication that these remarks are only a matter of our own opinions and not off of facts from the manufacturers.
Sherwin-Williams Duration
This brand is the most highly recommended paint of professional home remodeling contractors. Duration is their  top-of-the-line. Contractors prefer it, even though it is a bit pricey with prices ranging from $60 per gallon and lower, the quality of its one-coat coverage and excellent formulation is unmatchable. The cost per gallon is definitely offset by the savings in labor and quantity of paint required for the job. I’ll have you agree with me on a couple details:
- Does it make sense to save time and paint once? Yes.
- Would you save money in the end because you don’t have to do multiple coatings? Yes, because multiple coatings means more paint, which equals more money.
- Do you want your home to look nice? Well, duh!
The solution is to simply purchase a higher quality paint that will out-perform your expectations and give you that dreamy look you’ve been looking for.
Homeowners in New England with its extreme climate can turn to the professionals at United Home Experts who highly recommend and use Sherwin-Williams outdoor paint for all the reasons mentioned here.
Benjamin Moore Aura
Benjamin Moore’s answer to Sherwin-Williams Duration is its Aura line of paint. These two would be close picks  of professional painting contractors if it were not for the price difference.
Valspar DuraMax
It is a far less expensive exterior paint at $33 to $35 per gallon. It claims to be self-priming and is said that it requires only one coat for good coverage. Some homeowners give Valspar DuraMax a high rating, though most professional home remodeling contractors shy away from the big box house brands. In my own experience of painting my own home and many relatives’ homes, many of these lower priced paints do not perform well enough to meet my expectations and require multiple coatings.
Do not be fooled by the price; expensive paints are worth their salt because they are genuinely higher quality, so if the price seems too low to be true, it is almost certain that the quality has suffered.
It must be noted that Sherwin-Williams Duration and Benjamin Moore’s Aura are the top-of-the-line paint formulations for both paint manufacturers, with Sherwin-Williams offering excellent quality at a more competitive price than Benjamin Moore. The companies also offer a range of quality paints at many price levels.
Homeowners thinking about repainting the exterior of their homes should bear all these facts in mind. It does appear that the more expensive paint can actually saves them money in the long run. Whether handling a massive exterior paint job themselves or hiring a contractor to get the job done, it would be wise to seek the advice of professionals like those at United Home Experts. For our main painting page, click here!

Oil-based paints have excellent qualities of adherence, which is essential for a durable outdoor paint product. Their main disadvantage is brittleness that can lead to cracking.
Even with this drawback, oil-based outdoor paint is the desired formulation under two circumstances. The first has to do with an exterior surface that is heavy with chalking. The second issue crops up when the new oil-based paint is being applied over four or more layers of old oil-based paint. In both instances, only the oil-based paint should be used.
Oil-based paints should never be applied directly to unpainted masonry or galvanized iron. The paint fails rapidly on these surfaces.
Any messes incurred with oil-based paints demand that they be cleaned up with paint thinner and rags. The brushes and rollers must also be soaked in thinner until completely free of paint in order to be reused. Unlike water, paint thinner has a very strong odor and the thinner-soaked rags used for cleanup must be properly disposed of as paint thinner is highly flammable.
Repainting an exterior requires much research into the outdoor paint type and color as the project will make a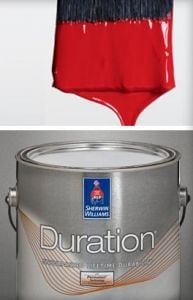 significant dent in the budget. The results must not only be visually appealing, but that visual appeal must last a long time so the process does not have to be repeated in a few years. Choosing the right type of paint for the job may be the most important consideration of all in terms of durability.
The New England states are fortunate to have a rich mix of historical homes, traditional homes and homes featuring the most modern designs and amenities. Homeowners there need professional advice before considering repainting their exterior. Here at United Home Experts, our team can advise you on the nature of their existing surface and how to properly deal with it.
For more detailed information and free estimates, contact the United Home Experts. For our main painting page, click here!
Every eight to ten years, the exterior of a home needs to be painted. A house requires paint for a variety of reasons. One reason can be aesthetics. The old paint job is simply looking shabby, making the home look old, rundown and as if it is not being properly cared for.
But there is also another reason for painting: paint protects a home. Wood and other materials need a coat of paint to protect them from the damaging aspects of the elements. With regular and proper painting, a home can last for hundreds of years.
Painting a home is a big job that most homeowners would rather give to qualified professionals, but knowing how the process works can aid in the decision-making process. The following outdoor painting tips are intended to make the homeowner’s job easier, smoother, and more long-lasting.
- Start by investing in top-quality equipment. This means spending the extra few cents for top-of-the-line
 rollers and paint brushes. Use high grade paint as well. Using high grade supplies and tools will result in a faster and better job. Remember, a workman is only as good as his tools. A homeowner cannot expect to get superior results using inferior tools or supplies.
 - Spring or fall are usually the best times of the year for outdoor painting. Do not paint if temperatures are below 40 degrees Fahrenheit or above 80 degrees. Try not to paint in high wind or in direct sunlight if possible. Too much direct sun can cause paint to dry too quickly, which can cause wrinkling and even cracking and flaking. If possible, plan paint jobs to “follow the shade.”
- Don’t skimp on time. Painting even a medium-size house is a huge undertaking – perhaps several weeks or even months. And keep in mind that the painting itself is actually less than half the job. Most of the homeowner’s time will be spent preparing the house to be painted. Preparation is the key.
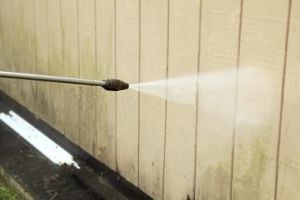
- Wash the house. Use a power washer if possible, but the homeowner needs to take his or her time and clean the house of all dirt, oil, grease, grime and mildew. This should include a detergent and hand scrubbing (using a nylon brush) of any stubborn areas. Plants should be protected from detergents and soaps by plastic drop-cloths.
- Repair areas that have become damaged in any way. If possible, discern the reason for the damage and solve the underlying problem, or the damage may simply repeat itself in a short time. Scrape and/or use a wire brush on any spots where old paint is flaking, blistering or peeling. A wire brush attachment for an electric drill can speed this process considerably. Sand areas that are peeling or flaking, getting down to raw wood whenever possible. As much old paint as possible, particularly lose old paint, must be removed before applying new paint.
- Lay in a supply of blue painter’s tape. This is the tape the homeowner applies to both certain parts of the woodwork as well as to the edges of windows and other areas on which the homeowner does not want the primary color of paint applied. When the blue tape is removed, following the final coat of the primary color, the area under the tape is paint-free and the special blue painter’s tape does not leave adhesive behind on the unpainted surfaces.While a homeowner may wish to choose an oil-based paint under some circumstances, most homeowners opt instead for a good grade latex paint. Latex protects as well as oil-based paints but latex paints go on smoother and easier and clean up with soap and water.
- Homeowners should always use the best quality paint that is consistent with their budget. The reason is
 simple. Lower-quality paints almost always take more coats to provide the same level of protection. The last thing a homeowner wants is for an undercoat to bleed through the final coat of a new color.
 - Bleed through can be averted by painting a primer coat before apply the final color. A primer is a light-colored (often white) lesser-quality paint designed to cover the old color, at least primarily. It is acceptable for the old color to show through the primer to some extent, since the final paint will be applied over the primer coat. Applying a primer coat requires the home to be prepped first and entails a large amount of work, time and expense.
 the house of all dirt, oil, grease, grime and mildew. This should include a detergent and hand scrubbing (using a nylon brush) of any stubborn areas. Plants should be protected from detergents and soaps by plastic drop-cloths.
However, applying a primer coat can be worth the time and the expense, especially when radically changing the color of a house and there is the possibility that the old paint will show through the new paint. It is less expensive to apply a coat of primer and then a coat of the more expensive paint, and it is also cost effective to put on one primer coat and two additional coats of more expensive paint as opposed to three coats of the more expensive paint.
As alluded to earlier, quality tools make all the difference. When painting a home’s exterior the homeowner should purchases the following, at a minimum:
- Nylon/polyester brushes if using latex paint – natural bristle brushes if using oil-based paint. At a minimum, a homeowner should purchase a 4-inch brush and a 2-and-a-half-inch brush. Never dip a brush all the way into paint. Load a brush only half way with paint and then scrape the brush on the side of the paint can to remove excess paint before applying paint in a long, slow stroke. Practice will allow the homeowner to apply an even coat of paint without visible brush strokes.
- Two different-sized rollers, one 7-inch roller and one 4-in roller should allow for the fast application of paint in any area. The smaller roller is often useful in applying paint to siding.
- “Cutting in” refers to using a paint brush to paint an area about 4-inches wide around corners and anywhere a roller cannot paint. Only cut in a relatively small area before covering the rest of an area with a roller as it is best to roller over cut-in paint that is still wet.
These basic tips help to give a sense of all that is required to repaint the exterior of a home. Homeowners who  decide that painting a home is beyond their skill level, or for homeowners who simply wish to have a professional do the job, the qualified staff at United Home Experts have years of experience. They can paint a home quickly and they clean up after themselves completely, do everything quickly and also provide a written guarantee.
Repainting a home not only enhances the home’s appearance and increases its value, a new-looking home also gives a homeowner a sense of pride of ownership which few other things in this world can match.
First-time homeowners should not attempt to paint the exterior of their homes by themselves. For more detailed information and free estimates, contact the United Home Experts. For our main painting page, click here!

Is It Time to Repaint the Outside of The House?
The outside of a home is one of the first things guests see when they come for a visit, and it might be the only part of the home that people passing on the street might see. As they say, first impressions are everything, so homeowners will most certainly want to make sure that their homes look their best from the outside.
Repainting outdoors can have a very dramatic effect on a home’s curb appeal. Many people live in a house for years without ever refreshing the paint on the outside – either because they don’t think it needs it, or because they don’t know the best way to go about it. The fact is, though, that there are some times when the outside of a house really needs to be repainted.
If the exterior paint is stained, chipped or fading, paint repair is definitely in order. Exterior paint damage can lead  to further damage to the home’s wood structure, and even internal damage to the home itself. Faulty paint can ultimately lead to a number of more serious issues for homeowners. Anyone who is unsure of whether the outside of their house needs to be repainted or not should consult with the professionals at United Home Experts.
Tips for Repainting the Home’s Exterior
After the decision is made to repaint the exterior of the home, the first thing many homeowners will want to do is pick a color for the exterior. Sherwin-Williams has a wide variety of outdoor paints that come in a number of different colors. All these color choices can be daunting for the inexperienced home remodeler. Again, a meeting with the United Home Experts should help any homeowner clarify their home’s needs.
Before repainting, the surface will need to be brushed free of dirt and debris, smoothed, and primed. In addition to paint colors, Sherwin-Williams has a good selection of exterior paint primers that can be tinted to match whatever shade is chosen for the job. Before priming is done, however, it will be necessary to remove any existing paint on the exterior surface of the house.
The homeowner will also need to make determinations regarding how they want to be apply the paint. Brushes are better for small detail work, while sprayers are obviously better for larger surfaces. Rollers can also be useful for outdoor painting because they come in a variety of shapes and sizes.
There are many more things that need to be taken into consideration before a repainting effort is made. Some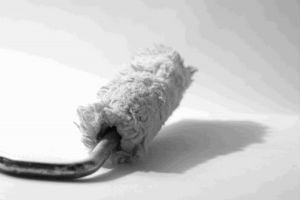 seasons of the year are better than others for painting outdoors. Fall, for example, is a great time for painting outside because the paint needs outside dry time to cure. Rain and humidity should be avoided at all costs. Also, there is the issue of whether or not the homeowner knows how to add aluminum wedges to improve air circulation to prevent moisture problems.
First-time homeowners should not attempt to paint the exterior of their homes by themselves. For more detailed information and free estimates, contact the United Home Experts. For our main painting page, click here!

Is It Time to Repaint?
There is nothing quite as important to a home’s interior decorating scheme as indoor paint. Repainting a room can have a dramatic effect on the overall appearance and feel of a home. Many people live in a house for years without ever repainting indoors – either because they just don’t think it needs it, or because they don’t know the best way to do it.
When is the best time to repaint? It really depends on the individual and the situation. If interior paint is stained, chipped or fading, it is definitely time to consider a change. But what if the interior paint isn’t damaged in some way? How can the informed homeowner know when it is time (and when it is not) to repaint?
Quite simply, if the paint color on the walls is beginning to look dull or boring or (even worse) is getting on the  homeowner’s last nerve, this is a very good indication that a change in color is in order. If the home is going to put on the market in the very near future, a fresh coat of paint can enhance the presentation of the house and make it that much easier to sell. Basically, the decision for such a change in the event that no actual paint damage has occurred is up to the individual homeowner. Anyone who is unsure of whether they need to repaint their home would do well to consult with the professionals at United Home Experts.
How to Repaint
After the decision is made to repaint indoors, the first thing that will need to be decided upon is the color of the room or the section to be painted. Many people stick with either white or off-white because they become too nervous about painting their space a color they will end up hating. This is really an unnecessary worry because repainting is not a very difficult task. Again, speaking with the United Home Experts should put any fears to rest.
Paint texture should also be taken into consideration. For example, flat paints work best on ceilings where there is  not as much risk of staining and less gloss is desired. High gloss paints work best in children’s rooms and other high traffic areas because they are easier to clean and more stain-resistant. Sherwin-Williams has an amazing selection of paints of various styles in many different shades, and most of these can be custom made according to the homeowners’ desires.
Before repainting, the surface will need to be sanded, smoothed, and primed. Sherwin-Williams also has a variety of indoor primers that can be tinted to match whatever shade is chosen for the job. The homeowner will also need to make determinations regarding how they want the paint to be applied. Brushes are better for small detail work, while rollers and sprayers are obviously better for larger surfaces.
There are several other things that need to be taken into consideration before a repainting effort is made. Some  seasons of the years are better than others. Also, homeowners will have to make determinations as to whether they want to remove furniture completely (if repainting whole rooms) or just shift it from one part of the room to another (if repainting only a section). These questions and many more can be answered by the United Home Experts. For our main painting page, click here!

Sun, rain, snow, and ice. Everyone knows that these adverse weather conditions can cause damage to human skin. That’s why there are things available to protect against these things, such as sunscreen, umbrellas, winter coats, and gloves. What most people may not realize, however, is that they need to protect the outsides of their homes from these weather conditions, just as they would need to protect themselves if they were going outside.
Think of it this way. Humans expose themselves to weather conditions for a certain amount of time before they go inside to get out of the cold, heat, or dampness. The exteriors of their homes do not have this luxury. Day in and day out, homes that are treated with exterior paint face the harsh realities of unpredictable weather. For this reason, it is necessary for homeowners to check the condition of their outside paint at least once a year. Chipped, cracking, or peeling paint exposes the wood to the elements as well, and this can cause serious damage to a home’s structure.
One of the things to look for is fading paint. Are there areas where the exterior paint is lighter than it is in other places? These lighter segments are the trouble spots. Paint fade is an indication that the wood is not being protected.
Also, look for signs of something called “alligatoring.” This is what happens when the paint starts puckering, wrinkling, and overall just looking like the skin on an alligator. This is a sign that water is getting through and penetrating the surface of the paint. When this is discovered, it’s important to repaint immediately to avoid any further damage.
In selecting a paint to use for exterior paint protection and repair, it is important to make the choice with an eye toward paint protection. First, it will be necessary to pressure wash any areas to be painted in order to get rid of all the damaged
paint and debris. Complete this step a few days in advance to give the wood enough time to dry.
Next, the wood will need to be primed. Sherwin-Williams Wood Primer is highly recommended, in either the oil-based or latex versions. The oil-based primer is better for areas that are prone to staining. The latex version is best for wetter areas, where mildew is a concern. Either type of primer can be tinted to match the color of the paint to be used.
After the primer is applied, it is time to paint. Two coats of very high quality latex paint like Sherwin-Williams’ A-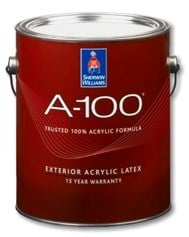 100(R) Exterior Acrylic Latex Paint should be used. This kind of paint is affected less by the sun’s ultraviolet rays than are other types of paint. It also adheres well to all wood surfaces and is less likely to experience blistering or puckering in wet conditions. It is a flexible, mildew-resistant paint that expands and contracts in relation to temperature changes to prevent paint cracking and peeling.
As soon as the first signs of fading paint and cracked surfaces appear, contact the professionals at United Home Experts. They carry a wide selection of paints and can give you more detailed advice on selecting the best paint protection for your home.