Tag Archive for: Roof Replacement

Successful roofing application requires that installers adhere to certain proper application methods. It is especially easy for inexperienced roofers and do-it-yourself homeowners to make certain roofing application mistakes simply because they are not aware of the various things that can go wrong. Here is a list of some of the most common mistakes and what can be done to avoid them, thus ensuring a successful roofing project.
Mistake: Not including the starter strip.
Problem: This does not provide the proper shingle application base.
Fix: Apply starter shingles at the rake, continuing along the eaves. The starter shingles should be cut to match the existing first course’s exposure. For new construction shingles, this means a measurement of nine inches. Three-tab repair shingles should measure five inches. Then about six inches off the length of the first shingle should be trimmed to stagger the shingles out from the first full course.
Mistake: Not ensuring that the shingles overhang at the eaves.
Problem: This could contribute to roof blow-off.
Fix: Make sure that the shingles overhang the eaves and rakes by at least one-half of an inch. There should be a spacing of about one-sixteenth of an inch between the shingles. Finish nailing three inches above the eaves, using the proper number of nails according to the geographic wind zone.
Mistake: Not properly aligning the shingles.
Problem: This is not at all aesthetically pleasing.
Fix: Vertical and horizontal shingle alignment will be required. This is best done in new shingle applications by using the chalk line. In repair application, the new shingles should be aligned with the shingles that are already in place. Horizontal chalk lines should be set every 10 inches from the bottom of the first course up. Vertical chalk lines should be set every 36 inches from the roof ridge to each shingle’s end, along the first course.
Mistake: Not properly nailing the shingles.
Problem: This could potentially lead to roof blow-off.
Fix: Follow the manufacturer’s recommendations in installing the proper number of shingles for the specific geographic wind zone. Four nails will be required in typical applications of three-tab shingles, but six nails will be required in areas where the wind velocity gets very high.
Placement of the nails is as important as the number of nails being used. Look at the manufacturer’s required placement areas to assess proper placement of the roofing nails. Drive the nails straight into the deck, never nailing from an angle if at all possible.
Know what nail length is needed before roofing application is attempted. Nails should penetrate the deck by at least three-quarters of an inch. Standard roofing nails with barbed shanks are typically 11-gauge or 12-gauge and have heads with diameters anywhere between three-eighths and seven-sixteenths of an inch.
Mistake: Using asphalt-based cements for shingle repair.
Problem: Use of incompatible materials contributes to further shingle damage.
Fix: Apply asphalt-based cement only on the underside of shingles. Damaged shingles with evidence of curling, cracking, opening, or splitting should all be replaced with brand new shingles.
This brief list represents just a few of the things that can go wrong in roofing application. Before attempting anything of this nature on their own, homeowners should consult with the professionals at United Home Experts, who can provide much needed information and advice about the best ways to repair and/or replace a roof and provide free estimates on complete roof replacement.

WHAT IS EPDM?
EPDM stands for Ethylene Propylene Diene Terpolymer.
It is a rubber membrane with a single ply that has been a major solution in the low-sloping commercial roof industry for over four decades. It is the most popular choice of architects, consultants and contractors in both new construction and replacement projects because of its value, quality, and other various benefits.
WEATHERING ABILITY
One of the major benefits of this roof type is its outstanding weathering ability. It is both waterproof and hail resistant. Because of this, it is ideal for a variety of climates, including here in the Northeast.
DURABILITY OF CONSTRUCTION
EPDM, because it is made from rubber, is also very flexible and durable. It is able to expand and contract in relation to weather changes, and this ensures that it will hold up better than other roofing solutions over time.
The unique way in which it is formulated ensures that EPDM is virtually resistant to exposure to harmful ozone and UV radiation. It also stands up well to the test of cold cracking. Because it does not rely on plasticizers to achieve flexibility, there is no potential danger of brittle membranes due to future plasticizer loss.
LONG LASTING
The lifetime costs of EPDM membranes have exceeded other popular low-slope systems, such as built-up roofing,  modified bitumen, and thermoplastic that have been mechanically attached.
The durability of the EPDM membrane has also led to very long life expectancy ratings, including over 23 years in covered applications, more than 26 years in exposed applications and an estimated ultimate service life of over 50 years.
ENERGY SAVING
EPDM offers a variety of options that enhance energy efficiency to commercial roofing professionals. White EPDM membrane systems have been built with increased UV resistance in mind. These types of systems offer similar performance characteristics to the black EPDM membranes, but with even more energy and environmental benefits. It has become increasingly popular to add white coatings to black EPDM membrane surfaces to extend the life of the roof, increase energy efficiency, and decrease pollution.
EPDM roofs that are ballasted often act the same, in construction, as roof surfaces that are reflective. Although stone ballasts and pavers are not as reflective as white coatings, ongoing industry tests indicate that there is a positive impact on energy usage with this EPDM system type. During the day, the ballast absorbs at the same time as it shades the roof membrane. Then, in the evening hours, the heat is released. Some other EPDM roofing accessories include garden roof systems and photovoltaic panels, which both help to increase a structure’s energy savings.

As is the case with any roofing system, insulation is crucial to ensuring that any building is energy efficient. Adding extra insulation to an EPDM roof can not only increase the effectiveness of a building’s thermal resistance, but it can also eliminate thermal short circuits and potential moisture issues.
CONCLUSION
With so many roofing options available today, it might seem daunting to choose which one would be best for any individual project. EPDM membranes, however, stand out as the most versatile material, and they have a proven track record that reinforces why this is the best option for nearly any construction project with a sloping roof.
Contact the professionals at United Home Experts today for an expert opinion on your next roofing project.
For more information on rubber roofing, read our Rubber Roofing page!

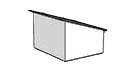
When it comes to the construction of a house, there are many roofing shapes and styles from which to choose – so many, in fact, that many people may not have the time to research all of them. Here is a quick list of 10 of the most popular and functional roof styles. We can install asphalt roof shingles on any of these styles of homes, except flat roofs, we use a different material called EPDM.
ROOF TYPES
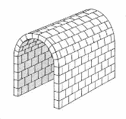

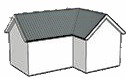
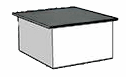
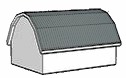
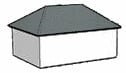


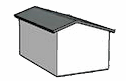
For project examples and more detailed information about different roofing shapes and styles when determining which ones might best suit their needs, homeowners should contact the professionals at United Home Experts. |


Flashing is a continuous series of thin pieces of sheet metal or other waterproof material that is installed to keep water from getting into a building from a vulnerable angle or joint. It typically operates under the principle that, in order for water to get through a joint, it must fight against gravity and work its way up. In the case of hard rain that is being driven by the wind, the driving force of the heavy rain would have to be diminished. Roof flashing can be installed in one of two ways. It can either be concealed or exposed on the outside of a building’s roof.
Flashing that is exposed is usually made of sheet metal like aluminum, copper, lead or lead-coated copper, painted galvanized steel, stainless steel, terne metal, or zinc alloy. This is how flashing got its name: the metal material catches the sunlight and reflects it, creating an eye-popping, flashing effect. Copper is one of the best metal materials to use for exterior flashing because it is durable and malleable. Using copper in any roofing project will ensure that no weak points exist in the roofing structure. As opposed to some other flashing materials, copper will not destruct if exposed for long periods to sunlight.
Concealed flashing is usually made of either sheet metal or a waterproofing membrane such as fabric made from bituminous coal or sheet material made from plastic. Which type of membrane is used really depends on the climate and on the building’s structural requirements. Aluminum and lead are not recommended for use as concealed flashing materials because they experience adverse chemical reactions when coming in contact with cement mortar.
There are two main kinds of roof flashing:
Flashing that is placed around objects that stick out from a building’s roof, like chimneys or pipes, to keep water from pooling at joints or seams by forcing it to run off.
Roof penetration flashing is used around cables, pipes, and supports to waterproof these vulnerable areas by providing a protective barrier.
There are many types and brands of flashing available on the market, but homeowners may have trouble deciding between all the different brands and styles. Flashing is a difficult project that is essential to execute with great precision, so it is a good idea for homeowners to seek professional help rather than try to do it themselves. The flashing has to be carefully constructed and strategically placed so that water is definitely deflected away from the roof’s trouble spots and not into the underlying structure of the roof (and the home). Flashing installation done by nonprofessionals can lead to all sorts of trouble for the homeowner and the home, including mold, water seepage, leaks and structural damage.
The trustworthy professionals at United Home Experts are specially trained in all aspects of roofing, so they know all the best types of flashing and are able to install it correctly, ensuring a quality roof maintenance or construction job for any home. Homeowners can contact them for a free estimate and expert advice before undertaking any roof project. For more information about roofs, visit our main roofing page!
Is fishing your thing? Then think Lake Maspenock. In the original native language, Maspenock means “choice fishing place.” There are more than 10 species of fish in the lake, including largemouth bass, yellow perch, white perch, bluegill and several others. During the winter months ice fishing is allowed.
It’s the little things, like ice fishing at Lake Maspenock that make living in Upton so worthwhile. Fortunately the homeowners of Upton believe that the town needs to look its best to maintain its quaint charm and grace.
One thing that helps the town to continue looking its best are all the new roofs which the homeowners of Upton 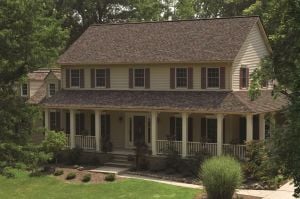 have install in recent years. Nothing makes a home – or a community – look shabby and uncared-for faster than a dilapidated roof.
Even so, the homeowners are quite choosy about the people they call a roofer in Upton. To be considered a credible roofing contractor in this town, a contractor must meet several rather stringent requirements.
For one thing, any local roofing contractor must offer a roof with an unconditional lifetime guarantee – including labor! Not only that, any local roofing contractor has to use only the highest grade of shingles, flashing and water-tight barriers and they have to be manufactured by Owens Corning, the recognized world leader in roofing products. Second best simply won’t do.
But probably most important is the fact tha any local roofing contractor must have a stake in Upton’s future. A roofer in Upton must have the best interests of the community and the homeowners at heart. A local roofer must have roofed more than a hundred homes in this town and must have a terrific reputation locally.
That’s an awful lot to ask for. Very few contractors can come even close to all of that. One that does is United  Home Experts. United Home Experts has a stake in Upton – they have roofed more than one hundred local homes and businesses and their reputation is spotless.
They also offer an unconditional lifetime guaranteed roof – including labor! That means that any homeowner who has a UHE roof installed will never have to think about a new roof again in their lifetime. Call UHE today and ask to speak with one of their highly-trained and very friendly roofing experts for all the particulars.
Of course, United Home Experts only uses the very best roofing products from the very best roofing products manufacturer – Owens Corning. You don’t want inferior products on your home and neither does UHE.
That brings up one last point. Besides using only Owens Corning products on your roof, UHE also uses the very  best, most highly-trained and skill roofing installers in the business. They have to. There is no other way to guarantee a roof for a lifetime. Unfortunately, some of United Home Experts competitors don’t think your home deserves the very best when it comes to installers. Some other roofing contractors here locally hire their installers from the back of a pick-up truck each morning at a local parking lot. Do you want workers like that working on your home, around your family?
So what about cost? The best cost more, right? Not in this case. United Home Experts roofs more homes and businesses than just about anyone else in this entire area. That means they use a lot of roofing materials.
So much roofing material, in fact, that they demand and get the lowest wholesale price possible, allowing them to pass the savings on to Upton’s homeowners. Check them out yourself. Call United Home Experts and talk roofs with them. Once you know they really are the roofing experts, then ask them about price. You’ll be simply amazed!

I’m going to let you in on a little secret that not everyone in Northborough knows. The best fishing in town is at Cold Harbor Brook. Here’s the real secret: the best fishing times for Cold Harbor are 10:00 a.m. until noon; the second best time to catch anything is from 1:00 p.m. to 3:00 p.m. Keep that under your hat.
There are a lot of little things about Northborough that not everyone knows, but the pride that Northborough homeowners show in their homes and in their town is plain for everyone to see. One aspect of that pride is in the way that local homeowners keep the roofs of their homes looking well-kept. Keeping up the appearance of a home’s roof is one sure-fire sign that a homeowner really cares about a home.
Not just anyone can waltz into town and claim to be a roofing contractor. The homeowners here demand a lot  from any roofer in Northborough. To begin with they want a roof that not only looks great but one which will last a lifetime – no one wants to re-roof a home, ever again.
Obviously any roofer in Northborough that plans to offer a lifetime guarantee on a roof will need to start with the highest-quality in roofing materials manufactured by the world-famous Certainteed Corporation. That goes without saying.
Also, any local roofing contractor needs to have roots in Northborough. In other words, a local roofer needs to have the best interests of both the homeowners and the town at heart. He must have roofed hundreds of local homes and businesses and have a spotless reputation.
That’s a lot to ask for in a roofer, but the homeowners of Northborough demand nothing less. Fortunately there is 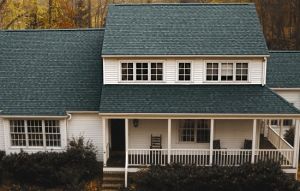 one roofing contractor here locally who measures up. United Home Experts has roofed more homes here in Northborough than probably anyone else. In fact, it is almost impossible to walk through Northborough’s lovely neighborhoods without spotting at least one home that has a United Home Experts’ roof on it.
If you want local references or testimonials, UHE has a file cabinet overflowing with them. Just ask.
One reason local homeowners are so happy with United Home Experts is because they offer a lifetime guaranteed roof. Naturally they use only the highest grade flashing, water-tight seals and shingles manufactured by none other than the Certainteed Corporation. UHE not only guarantees its roof for a lifetime, their guarantee also includes labor. Just ask one of UHE’s knowledgeable and super friendly roofing experts for all the details.
There’s one other reason United Home Experts can offer a lifetime guarantee on your roof. It’s because they have the best roof installers in the business. Each of their installers has been hand-picked and carefully trained. Most of their roofing teams have been working together for years. Unfortunately, some of UHE’s competitors don’t think you need that level of expertise when it comes to installing your roof. Instead of using the same well-trained crews all the time, some local roofing contractors hire their installers by the day, picking them up every morning from some home center parking lot. Are those the type of installers you want around your home…around your family?
The best usually costs more – but not in this case. United Home Experts is probably the biggest roofer in this entire area so they buy their roofing materials in bulk, at deeply-discounted wholesale prices. They then pass this savings on to the homeowners of Northborough. So when you call United Home Experts try not to be too surprised at the price they quote you – or the lifetime guarantee on your new roof. For more information about our roof services, please visit our main roofing page!