
There is nothing like a quality paint job on an exterior to add visual appeal, protection and value to the home. Painting a home’s exterior takes time and consideration, particularly when it comes to choosing outdoor paint. It is not just the color that needs careful consideration. The quality of the outdoor paint will make a substantial difference in its durability and its ability to keep the color fresh and new-looking after several years of exposure to the elements. Homeowners in harsh and extreme weather conditions such as in the New England states must pay particular attention to the quality of the exterior paint.
When it comes to outdoor paint prices, it is a bad decision to purchase the cheapest paint available, even if the color is perfect. The pricier paint is actually formulated differently than the cheap brands. The higher price is due to the cost of the premium ingredients used in manufacturing the paint.
Any home improvement store, large or small, will offer a massive array of outdoor paint colors. The brands they stock will differ, however. Some will offer Behr or Olympic; others Valspar, Glidden or Dutch Boy. Sherwin-Williams has its own chain of retail stores. Following are the top three outdoor paint brands used and recommended by professional painting contractors.
I just want to make a clear indication that these remarks are only a matter of our own opinions and not off of facts from the manufacturers.
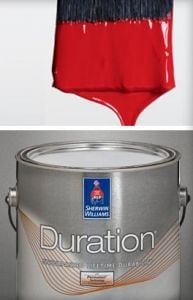
Sherwin-Williams Duration
This brand is the most highly recommended paint of professional home remodeling contractors. Duration is their  top-of-the-line. Contractors prefer it, even though it is a bit pricey with prices ranging from $60 per gallon and lower, the quality of its one-coat coverage and excellent formulation is unmatchable. The cost per gallon is definitely offset by the savings in labor and quantity of paint required for the job. I’ll have you agree with me on a couple details:
- Does it make sense to save time and paint once? Yes.
- Would you save money in the end because you don’t have to do multiple coatings? Yes, because multiple coatings means more paint, which equals more money.
- Do you want your home to look nice? Well, duh!
The solution is to simply purchase a higher quality paint that will out-perform your expectations and give you that dreamy look you’ve been looking for.
Homeowners in New England with its extreme climate can turn to the professionals at United Home Experts who highly recommend and use Sherwin-Williams outdoor paint for all the reasons mentioned here.
Benjamin Moore Aura
Benjamin Moore’s answer to Sherwin-Williams Duration is its Aura line of paint. These two would be close picks  of professional painting contractors if it were not for the price difference.
Valspar DuraMax
It is a far less expensive exterior paint at $33 to $35 per gallon. It claims to be self-priming and is said that it requires only one coat for good coverage. Some homeowners give Valspar DuraMax a high rating, though most professional home remodeling contractors shy away from the big box house brands. In my own experience of painting my own home and many relatives’ homes, many of these lower priced paints do not perform well enough to meet my expectations and require multiple coatings.
Do not be fooled by the price; expensive paints are worth their salt because they are genuinely higher quality, so if the price seems too low to be true, it is almost certain that the quality has suffered.
It must be noted that Sherwin-Williams Duration and Benjamin Moore’s Aura are the top-of-the-line paint formulations for both paint manufacturers, with Sherwin-Williams offering excellent quality at a more competitive price than Benjamin Moore. The companies also offer a range of quality paints at many price levels.
Homeowners thinking about repainting the exterior of their homes should bear all these facts in mind. It does appear that the more expensive paint can actually saves them money in the long run. Whether handling a massive exterior paint job themselves or hiring a contractor to get the job done, it would be wise to seek the advice of professionals like those at United Home Experts. For our main painting page, click here!

 significant dent in the budget. The results must not only be visually appealing, but that visual appeal must last a long time so the process does not have to be repeated in a few years. Choosing the right type of paint for the job may be the most important consideration of all in terms of durability.
 rollers and paint brushes. Use high grade paint as well. Using high grade supplies and tools will result in a faster and better job. Remember, a workman is only as good as his tools. A homeowner cannot expect to get superior results using inferior tools or supplies.
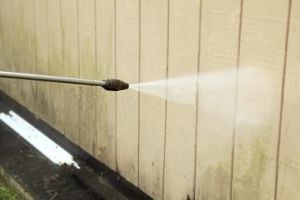 the house of all dirt, oil, grease, grime and mildew. This should include a detergent and hand scrubbing (using a nylon brush) of any stubborn areas. Plants should be protected from detergents and soaps by plastic drop-cloths.
 decide that painting a home is beyond their skill level, or for homeowners who simply wish to have a professional do the job, the qualified staff at United Home Experts have years of experience. They can paint a home quickly and they clean up after themselves completely, do everything quickly and also provide a written guarantee.
 to further damage to the home’s wood structure, and even internal damage to the home itself. Faulty paint can ultimately lead to a number of more serious issues for homeowners. Anyone who is unsure of whether the outside of their house needs to be repainted or not should consult with the professionals at United Home Experts.
 homeowner’s last nerve, this is a very good indication that a change in color is in order. If the home is going to put on the market in the very near future, a fresh coat of paint can enhance the presentation of the house and make it that much easier to sell. Basically, the decision for such a change in the event that no actual paint damage has occurred is up to the individual homeowner. Anyone who is unsure of whether they need to repaint their home would do well to consult with the professionals at United Home Experts.
 not as much risk of staining and less gloss is desired. High gloss paints work best in children’s rooms and other high traffic areas because they are easier to clean and more stain-resistant. Sherwin-Williams has an amazing selection of paints of various styles in many different shades, and most of these can be custom made according to the homeowners’ desires.
 seasons of the years are better than others. Also, homeowners will have to make determinations as to whether they want to remove furniture completely (if repainting whole rooms) or just shift it from one part of the room to another (if repainting only a section). These questions and many more can be answered by the United Home Experts. For our main painting page,
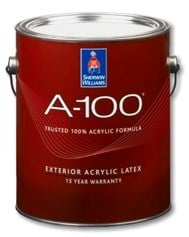 100(R) Exterior Acrylic Latex Paint should be used. This kind of paint is affected less by the sun’s ultraviolet rays than are other types of paint. It also adheres well to all wood surfaces and is less likely to experience blistering or puckering in wet conditions. It is a flexible, mildew-resistant paint that expands and contracts in relation to temperature changes to prevent paint cracking and peeling.
 spatters as well as the chemicals in cleaning solutions and paint strippers:
 operated by an experienced operator, as this tool can cause serious damage to an exterior if misused.
 the exterior.
 detailed recommendations.
 drop-cloth on top of that. Should a light fixture be immovable, wrap it carefully with plastic. A garbage bag serves this purpose well.
 on which one to use depends on the wood species to be stained, the space in which the work will be accomplished, and how important environmental friendliness is to the homeowner.